How to send Errors into Slack
Easy access to error logs by using a tool you already have available.

If you are using Slack at your company, then the chances are that you have the Slack client running on your desktop and phone. Having your errors more visible in a Slack channel will make it easier to find and notice them.
This solution is best suited in a smaller internal tool. When solutions grow, they need more advanced tooling for error tracking. But getting your errors to Slack is an easy way to get started. If you are not using Slack, you could convert the ideas behind this article to your tooling.
In this article, I will create a beautiful message and send it to a Slack channel. I will also show the steps needed to get your channel running.
I’m using Angular, but it could as well have been vanilla JavaScript or any other framework.
The example code is on Github.

What is Slack?
The name is an acronym for “Searchable Log of All Conversation and Knowledge.”
Basically, it is a communications tool for groups where you create a workspace with multiple channels. Every channel can be public or private with its own topic.
 — it’s like IRC](https://cdn-images-1.medium.com/max/2000/0*A-i7m6WVoelPwqhB.png) xkcd — it’s like IRC
xkcd — it’s like IRC
There also are lots of different apps and integrations. You can, for example, have your builds in one channel and deploys in another by sending data to Slack from your chosen tool.
Or as Slack says: “Where work happens”
Why use Slack for Errors?
If your company is using Slack as a communication tool, then it makes sense to integrate it with your tooling. You can, for example, record your failing builds and deploys there. And why not then also log your errors there?
Since you probably already have Slack open on your desktop and maybe on your phone as well, all these logs will be more available to people.
Having Slack open on all devices makes it easier to notice when something bad is happening.

Every solution can have its Slack channel for errors. You can also differentiate for different environments like test and production. Errors can also be customized as needed as we will see later in this article.
Slack Account
If you are already using Slack, you can skip these next steps and jump right to the coding part.
To be able to test our code we need to have a Slack channel where to send the errors.
Follow this 5 step recipe:
Visit the workspace creation page: slack.com/create.
Enter your email address. Make sure it’s an inbox you can access for the next step!
Slack will send a confirmation code to the email address you entered. Keep an eye on your inbox for the email.
When the email arrives, enter your confirmation code to continue.
Follow the directions on each page. You’ll have a chance to select a display name, password, and workspace name.
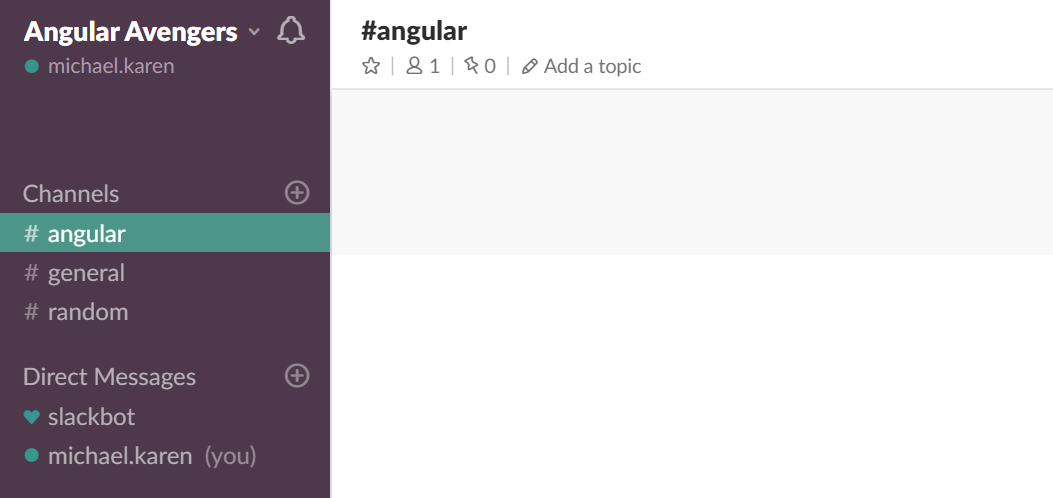
For this example, I created the workspace Angular Avengers, and I got the URL: https://angular-avengers.slack.com/.
Webhook
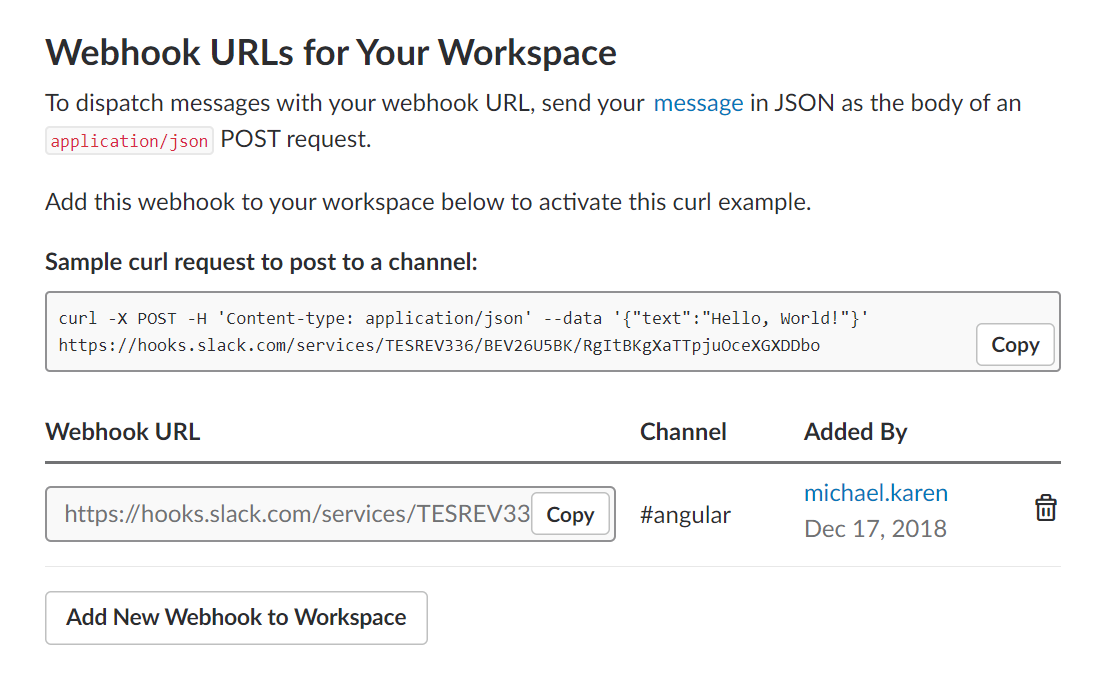
Before we start coding, we need an address where to send our errors. For this, we need a Slack app with a Webhook. This is the way we add tooling to our workspace.
Incoming Webhooks are a simple way to post messages from apps into Slack. Creating an Incoming Webhook gives you a unique URL to which you send a JSON payload with the message text and some options.
Create a Slack app (if you don’t already have one).
Enable Incoming Webhooks from the settings page.
After the settings page refreshes, click Add New Webhook to Workspace.
Pick a channel that the app will post to, then click Authorize.
Use your Incoming Webhook URL to post a message to Slack.
OK, now that we have all the Slack infrastructure in place we can start coding our Angular application.
Like this blog post? Share it on Twitter! 🐦
The Application
The app is just a button that sends Errors to the Slack channel.
Remember to add HttpClientModule to app.module imports to be able to use HttpClient to post the errors to Slack.
The Slack service needs to take care of three things before it can post the errors.
Set the Webhook
Define a Slack message
Set content-type header
We have already got the Webhook URL so now its time to use it.
const webHook = 'your-webhook-url';
Sending the Message
Messages are the basic building block of all conversations on Slack. The minimum viable message consists of the channel and a text.
const message = {
  channel: '#angular',
  text: error.message
}
We also need to set the content-type header, or we will run into a CORS error. Text/HTML, which is the default, is not accepted by Slack.

const options = {
  headers: new HttpHeaders(
    { 'Content-Type': 'application/x-www-form-urlencoded' }
  )
};
Now we have all the three parts and are ready to post to Slack.
this.http.post(webHook, message, options).subscribe();
When we click the button, an error appears in the Slack channel! 🎉

That’s great, but this message is not giving us enough information. Let’s see what we can do to improve it.
Message Attachments
We can add some more context to the message by adding an attachment to it. I’m not going into detail on styling messages, but there is excellent info in the Slack API documentation.
attachments: [
  {
    author_name: window.location.href,
    color: 'danger',
    title: 'Trace',
    text: error.stack
  }
]
Now the message looks better.
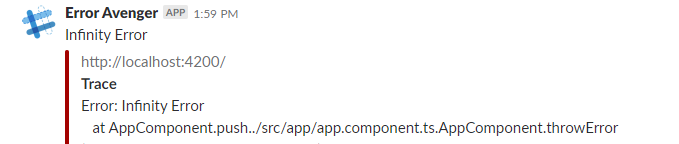
I think this would be enough to get us started on locating the bug.

Too Many Errors
What if you run into a looping type of situation that throws bugs at you and just won't stop. It will flood your channel pretty quickly. 😨
For some protection, we can save the last error that we sent to Slack and compare the new bug to it. If it has the same message and attachments then we don’t send it.
Security
You will be exposing your Webhook client side. Anyone could then get hold of it and post to it. Therefore a better solution could be first to send the errors to a secure API. And if errors occur server side, then you should consider not making a roundtrip but send them to Slack straight away.
In other words, the solution presented here is not for your enterprise solution where security is paramount. It is more of an example of how you quickly can get started.
Hints
Set the correct content-type header.
Exclude the Authorization header from Slack calls.
Keep error channels private.
Consider security by sending the errors server side.

Other use cases
There might be other use cases better suited than error logging. You could, for example, send a notice everytime you sell a particular item in your webshop. Or when a new feature is being used. Please comment if you have any good ideas.
Conclusion
Slack is an excellent way to centralize errors easily. If you already have a company workspace in Slack, it is easy to start logging your errors to private channels.
When your application grows, you can consider moving to more advanced error tracking tools like Sentry, TrackJS, etc.
The example code is on Github.
Call to Action
I always enjoy feedback so please 👏, 📝 and tweet 🐦. Follow me on Twitter and Medium for blog updates.