How to get started with Canvas animations in Angular
Or how my dreams of writing a game started by animating a square block

I love playing games. And I love coding too. So, one day, I got thinking, why not use those coding skills to make a game? But it sounds hard. How would one even get started?
With baby steps. 👣
First, we need some 2D graphics. In this case, it’s moving some blocks on the screen. So, in this article, I will show how to draw and animate objects using the HTML5 Canvas and JavaScript. I will also go through some techniques to optimize performance. Who knows, it might come in handy some day.
“Animation is not the art of drawings that move but the art of movements that are drawn.” — Norman McLaren
 on [Unsplash](https://unsplash.com?utm_source=medium&utm_medium=referral)](https://cdn-images-1.medium.com/max/9600/0*P920hd3fOZ3IS9nF)
Introduction
Apple introduced canvas in 2004 to power applications and the Safari browser. A few years later it was standardized by the WHATWG. It comes with finer grained control over rendering but with the cost of having to manage every detail manually. In other words, it can handle many objects, but we need to code everything in detail.
The canvas has a 2D drawing context used for drawing shapes, text, images, and other objects. First, we choose the color and brush, and then we paint. We can change the brush and color before every new drawing, or we can continue with what we have.
Canvas uses immediate rendering: When we draw, it immediately renders on the screen. But, it is a fire-and-forget system. After we paint something, the canvas forgets about the object and only knows it as pixels. So there is no object that we can move. Instead, we have to draw it again.
Doing animations on Canvas is like making a stop-motion movie. In every frame need to move the objects a little bit to animate them.
Using Canvas ✏️
To get started, we need to add a canvas element in our HTML. We'll also attach a reference variable to the element so that we'll be able to refer to it from the component class:
<canvas #canvas width="600" height="300"></canvas>
In the component class, we can then use the **@ViewChild() decorator to inject a reference to the canvas.
In Angular 8**, a new static flag has been introduced not to break existing applications. Read more about it here. Since I want access to the canvas in the ngOnInit hook I set it to true.
@ViewChild('canvas', { static: true })
canvas: ElementRef<HTMLCanvasElement>;
Once the component has initialized, we’ll have access to the Canvas DOM node, as well as its drawing context:
this.ctx = this.canvas.nativeElement.getContext('2d');
Here is the starting code for the component:
import { Component, ViewChild, ElementRef, OnInit } from '@angular/core';

@Component({
  selector: 'app-root',
  template: `
    <canvas #canvas width="600" height="300"></canvas>
    <button (click)="animate()">Play</button>
  `,
  styles: ['canvas { border-style: solid }']
})
export class AppComponent implements OnInit {
  @ViewChild('canvas', { static: true })
  canvas: ElementRef<HTMLCanvasElement>;

  private ctx: CanvasRenderingContext2D;

  ngOnInit(): void {
    this.ctx = this.canvas.nativeElement.getContext('2d');
  }

  animate(): void {}
}
Now we have a canvas and a button to start the animation.
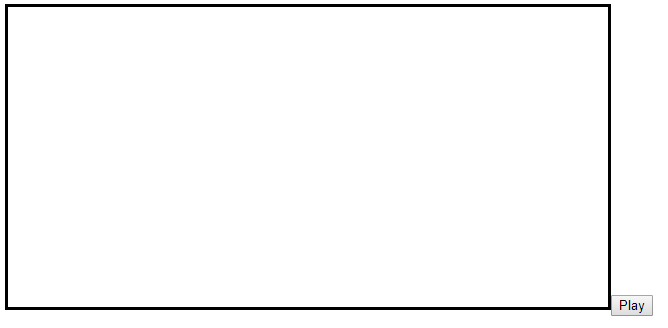
Let’s paint something on it!
Painting 🔵
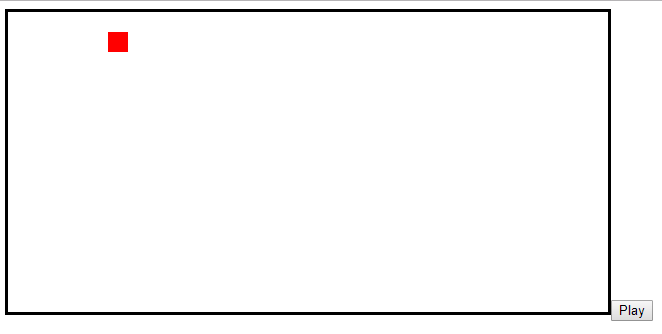
Once we have a canvas context in the component class, we can draw on it using the standard canvas context API. We can use fillRect() to draw a square. It draws a filled rectangle colored by the current fill style.
ctx.fillRect(x, y, width, height);
So to draw a small red rectangle with a side of 5 pixels:
this.ctx.fillStyle = 'red';
this.ctx.fillRect(0, 0, 5, 5);
To outline the square, we could use strokeRect():
this.ctx.strokeRect(z * x, z * y, z, z);
Let’s create a Square class with a drawing method that draws squares:
export class Square {
  constructor(private ctx: CanvasRenderingContext2D) {}

  draw(x: number, y: number, z: number) {
    this.ctx.fillRect(z * x, z * y, z, z);
  }
}
I’m using z here for the side lengths of the squares.
Let’s try to use it in animate():
animate() {
  this.ctx.fillStyle = 'red';
  const square = new Square(this.ctx);
  square.draw(5, 1, 20);
}
We have painted our first element on the canvas! 🎉
Check out some more advanced examples on MDN.
Like this blog post? Share it on Twitter! 🐦
Animation 🎥
Now, let’s see if we can get our block to move on the canvas. We can create a function for this. With a loop, we can move the x value on the canvas and draw the object over and over again. Here I move the block to the right until it reaches the canvas end. We send in y for vertical position and z for size.
move(y: number, z: number) {
  const max = this.ctx.canvas.width / z;
  for (let x = 0; x < max; x++) {
    this.draw(x, y, z);
  }
}
Let’s change from drawing the square to moving it:
square.move(1, 30);
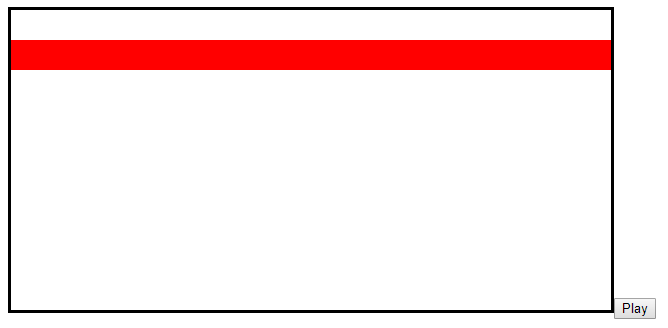
OK, we were able to draw the square as we wanted. But we have two issues:
We are not cleaning up after us.
It’s too fast to see the animation.
We need to clear away the old block. What we can do is to erase the pixels in a rectangular area with clearRect(). By using the width and height of the canvas, we can clean it between paints:
move(y: number, z: number) {
  const max = this.ctx.canvas.width / z;
  const canvas = this.ctx.canvas;
  for (let x = 0; x < max; x++) {
    this.ctx.clearRect(0, 0, canvas.width, canvas.height);
    this.draw(x, y, z);
  }
}
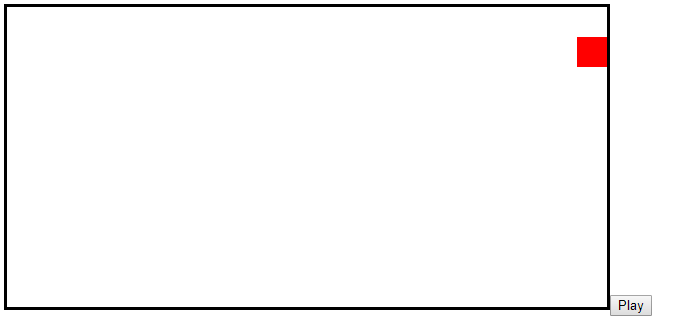
Great! We fixed the first problem. Now let’s try to slow down the painting so we can see the animation.
You might be familiar with setInterval(function, delay). It starts repeatedly executing the specified function every delay milliseconds.
I set the interval to 200 ms, which means the code will run five times a second.
move(y: number, z: number) {
  const max = this.ctx.canvas.width / z;
  const canvas = this.ctx.canvas;
  let x = 0;
  const i = setInterval(() => {
    this.ctx.clearRect(0, 0, canvas.width, canvas.height);
    this.draw(x, y, z);
    x++;
    if (x >= max) {
      clearInterval(i);
    }
  }, 200);
}
To stop a timer created by setInterval, you need to call clearInterval and give it the identifier for the interval you want to cancel. The id to use is the one that is returned by setInterval, and this is why we need to store it.
We can now see that if we press the button, we get a square that moves from left to right.
But, if we press the play button several times, we can see that there is a problem when we try to animate multiple squares at the same time. It’s not working when every block has an interval that clears the board and paints on its own.

It’s all over the place! Let’s see how we can fix this.
Multiple objects
To be able to run the animations for several blocks, we need to rethink the logic. We only need one interval that paints all the objects simultaneously. Every time we press the play button, we add a new Square to a squares-array. The interval then clears the screen and paints all the objects in the array. This way, we avoid the flicker we had before.
setInterval(() => {
  this.ctx.clearRect(0, 0, this.width, this.height);
  this.squares.forEach((square: Square) => {
    square.moveRight();
  });
}, 200);
We can move the coordinates to the square model since we don’t need to know about its internals to move it. Instead of a general move command we could call it with commands to move in different directions.
export class Square {
  private color = 'red';
  private x = 0;
  private y = 0;
  private z = 30;

  constructor(private ctx: CanvasRenderingContext2D) {}

  moveRight() {
    this.x++;
    this.draw();
  }

  private draw() {
    this.ctx.fillStyle = this.color;
    this.ctx.fillRect(this.z * this.x, this.z * this.y, this.z, this.z);
  }
}
And now we get better animations.
What we did here is the first step of making a game loop. This loop is the heart of every game. It’s a controlled infinite loop that keeps your game running — it’s the place where all your little pieces will be updated and drawn on the screen.
🚶Optimize animations 🏃
Another option for animating is to use requestAnimationFrame. It tells the browser that you wish to perform an animation and requests the browser to call a function to update an animation before the next repaint. In other words, we tell the browser: “Next time you paint on the screen, also run this function because I want to paint something too.”
The way to animate with requestAnimationFrame is to create a function that paints a frame and then schedules itself to invoke again. With this, we get an asynchronous loop that will execute when we draw on the canvas. We will be invoking the animate method over and over again until we decide to stop.
animate() {
  // Do stuff
  const id = requestAnimationFrame(this.animate);
}
There is no recursion here, since the function is not calling itself. It is
requestAnimationFramethat is asking foranimateto be called.
The requestAnimationFrame method returns an id that we use for canceling the scheduled animation frame. To cancel a scheduled animation frame, you can use the cancelAnimationFrame method. This method should be passed the id for the frame you wish to cancel.
cancelAnimationFrame(id);
So, in conclusion, why should we use requestAnimationFrame instead of setInterval or setTimeout?
It enables browser optimizations.
It handles the frame rate.
Animations only run when visible.
Another gotcha with requestAnimationFrame is that when we re-schedule we need to bind the call to this, or it will have the window object as its context. Since the window object doesn't contain the animate`` function, we get an error like:Cannot read property ‘animate' of undefined.`
animate() {
  // Do stuff
  requestAnimationFrame(this.animate.bind(this));
}
What about Change Detection?
Angular applications execute inside an “Angular Zone”, which makes change detection automatically run without us having to do anything. When events like a mouse click or an HTTP response occur, we enter the zone and run the event handling code. Then, we exit and Angular performs change detection for the application. In most cases, you don’t need to worry about this. But when we fire timers frequently like like setInterval, setTimeoutor requestAnimationFrame, we are also firing off change detection.
By default, every requestAnimationFrame runs inside NgZone and triggers change detection. This could mean that we end up running change detection 60 times a second. Since our application is small and Angular’s change detection is fast, we will most likely not notice it. But it could become a problem, so how do we solve it?
To run animations outside the zone, we use the ngZone.runOutsideAngular function. This function accepts a callback where we can execute the animate function.
constructor(private ngZone: NgZone) {}

...

this.ngZone.runOutsideAngular(() => this.animate());
This code runs the first frame outside the NgZone, and it will also run all the subsequent frames outside the zone. With this small change, we've achieved a potentially significant performance improvement to the animation loop.
Max Koretskyi aka Wizard, has more about change detection:
We don’t need all this optimization in our simple animation but to see some example code, I have prepared a StackBlitz.
https://stackblitz.com/edit/angular-canvas-animations
Conclusion
In this article, you learned how to use the HTML5 Canvas and its 2D graphics context. I showed how to draw simple shapes, and finally, we were able to animate multiple objects on the canvas. We learned how to use setIntervalto create an animation loop that keeps track of the objects on the screen.
We also learned how to optimize animations with requestAnimationFrame and how we can run outside the “Angular Zone”.
With this intro to canvas animations, we have taken our first steps into game development. I think we are ready to start on a real game next: