Game Development: Breakout in JavaScript
In this article, we create a complete Breakout-style game. The HTML Canvas provides the game container where we draw graphics via JavaScript. After learning how to use the Canvas for graphics and animations, we go through the algorithms behind collisions using basic shapes like circles and rectangles. With these concepts and a sprinkle of game loops and sound, we will soon have a game ready to be played!
Check out the code in my GitHub repository js-breakout or play the game!
If you like JavaScript games, you might like my article about Tetris:
When we talk about legendary games, Breakout is on the list. And not only because it is Atari’s single-player sequel to Pong, but also because both Steve Jobs and Steve Wozniak worked on it and later founded Apple with some of the money. By modern standards, the game is pretty simple but in 1976, the year I was born, it was revolutionary. Ten years later, the concept found new legs with Taito’s 1986 Arkanoid, which itself spawned dozens of imitators. The genre is known as block breaker games.
The game’s success continues to this day, and Atari continues to port it to new platforms. Indeed, you can find an official port on Android, iPhone, and iPad. Breakout is one of the most cloned games of all time. Let’s see if we can add to that statistics with the help of this course.
Game design
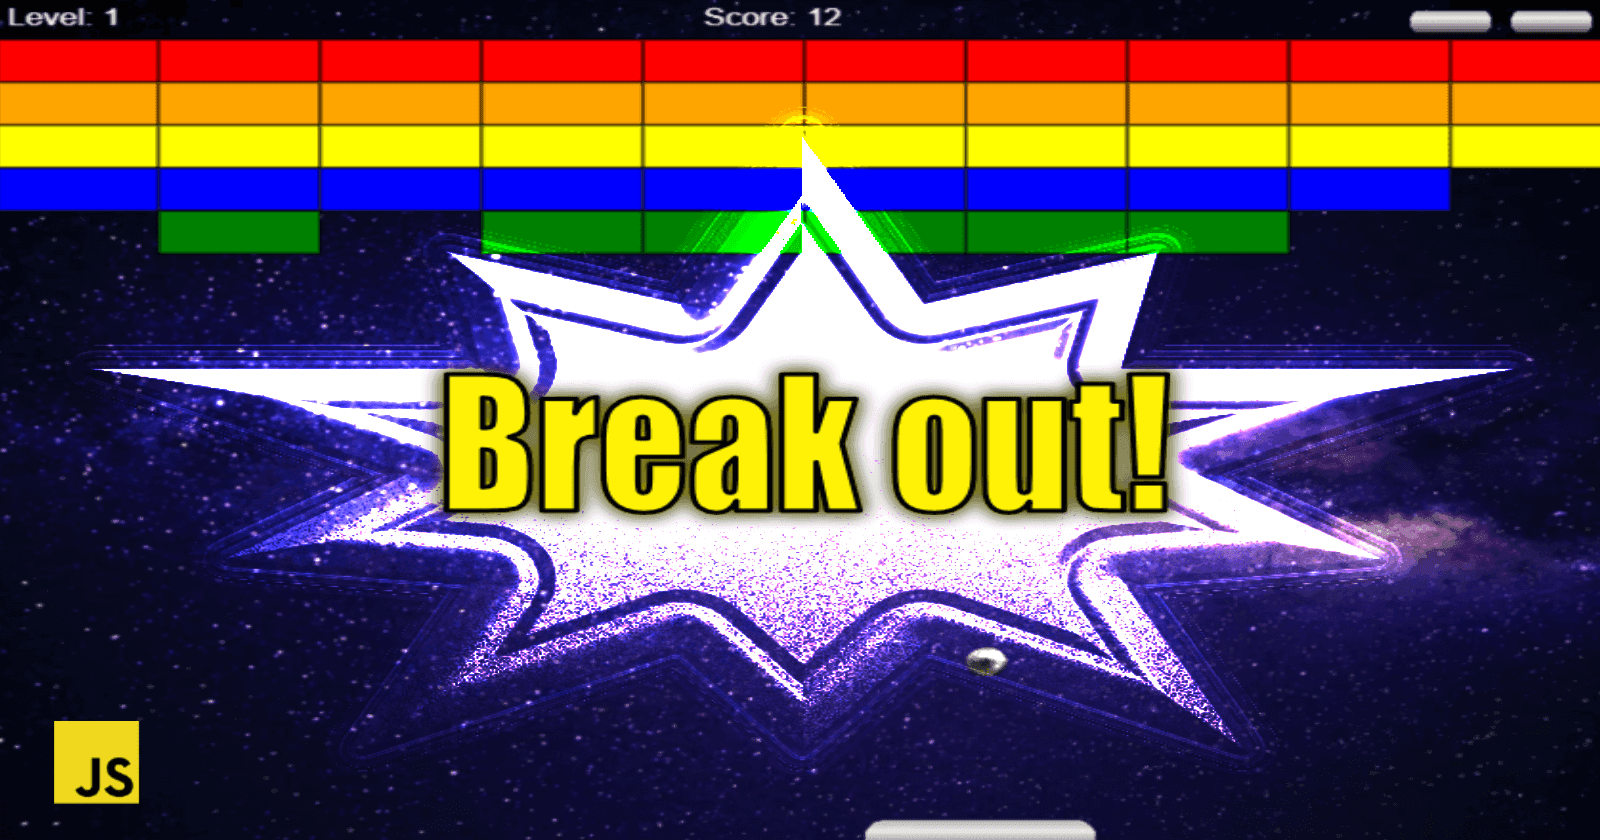
All Breakout-style games have at least three things in common — each contains paddles, balls, and bricks.
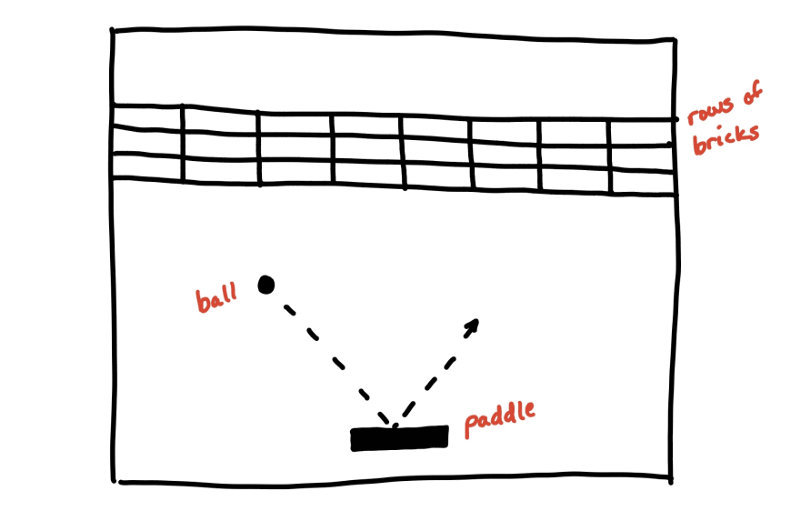
The player has to break through rows of brick walls by bouncing a ball against it with a paddle. The bricks are in different colors. Depending on the color, bricks can award more points and be harder to break. And to make the game more challenging, at some points in the game, the speed might increase. And as the final hurdle, the paddle can decrease its size when the player breaks through the last row. If the player loses the ball three times, it’s game over.
Getting started
Before starting with the game’s functionality, we need to create a basic structure to render the game inside. We can do this with HTML and the <canvas> element.
It’s good practice to split code into different files even if the project is not that big:
index.html— The main file with links to the others. The order of the scripts that we add at the end is essential.styles.css— Contains the styles.breakout.js— JavaScript code for the game.
We can consider splitting the JavaScript into multiple files when it grows bigger.
HTML and CSS
The HTML document structure is quite simple, as the game renders on the <canvas> element. The only other part that we need to worry about is the button that starts the game.
<!DOCTYPE html>
<html>
<head>
  <meta charset="utf-8" />
  <title>Breakout Game</title>
  <link rel="stylesheet" type="text/css" href="styles.css" />
</head>
<body>
  <canvas id="breakout" width="600" height="400"></canvas>
  <br/>
  <button id="play-button" onclick="play()">Play</button>

  <script type="text/javascript" src="breakout.js"></script>
</body>
</html>
#breakout {
  background-color: black;
}

#play-button {
  background-color: green;
  padding: 0.5rem 1rem;
  cursor: pointer;
}
The JavaScript
At the end of the HTML file, we add references to our JavaScript files. <script> elements contain JavaScript code executed by the browser.
For now, we can add an empty function corresponding to the onclick event that we add to the play button:
function play() {}
With this, we have our game container styled and ready, awaiting code.
Canvas
Drawing graphics and creating animations in the browser can be done in a few different ways. In this course, we use HTML5 Canvas, with a feature set ideal for producing 2D and 3D games. The canvas element is defined in HTML code using width and height attributes. Then we can use the HTML5 Canvas API by writing JavaScript. We access the canvas through drawing functions to dynamically generate graphics.
Canvas context
The canvas has a 2D drawing context used for drawing shapes, text, images, and other objects. First, we choose the color and brush, and then we paint. We can change the brush and color before drawing or continue with what we have.
The HTMLCanvasElement.getContext() method returns a drawing context, where we render the graphics. By supplying '2d' as the argument we get the canvas 2D rendering context:
const ctx = canvas.getContext('2d');
There are other available contexts, like
webglfor a three-dimensional rendering context, outside the scope of this article.
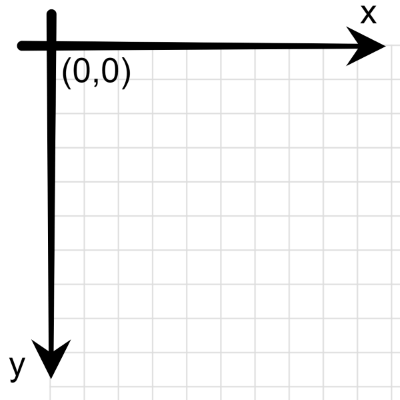
Coordinate system
The HTML canvas is a two-dimensional grid. The upper-left corner of the canvas has the coordinates (0, 0).
If you are interested in more detail about the Canvas, you can check my article:
Graphics
We can draw the ball using an image for a better-looking game. But, before we do that, we need to keep track of the position and other values connected to the ball. To do this, we can define a ball object. We start by defining the only constant value we know at the moment it will have, the radius:
const ball = {
  radius: 10
}
When the game starts, we want to give the ball some initial values, like its position. We define the starting x and y coordinates of the ball to the bottom center part of the canvas in the function resetBall() that we then call from the play() function:
function resetBall() {
  ball.x = canvas.width / 2,
  ball.y = canvas.height — 100
}
It will be helpful later on to have a function for resetting the starting values for the ball instead of defining them in the ball object.
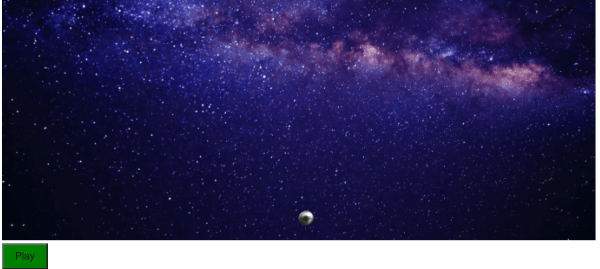
Next, we define the images we use for the ball and background. For each object property, we first create it as a new Image() and then set its src to the files we are using:
let images = {
  background: new Image(),
  ball: new Image()
}

images.background.src = 'bg-space.webp';
images.ball.src = 'ball.webp';
The images are in the WebP format, yielding smaller files of the same quality as PNG or JPEG.
To draw the images, we use drawImage(), which provides different ways to draw an image onto the canvas:
ctx.drawImage(image, x, y, width, height);
We provide the coordinates to the top left corner of the image and then the size of the image. For the background, we use the width and height of the canvas to have the background image cover the whole playing field. For the ball, we double the radius to get the diameter, which acts as both the width and height of the ball image:
// draw background
ctx.drawImage(images.background, 0, 0, canvas.width, canvas.height);

// draw ball
ctx.drawImage(images.ball, ball.x, ball.y, 2*ball.radius, 2*ball.radius);
Animation
Now that we know how to draw on the canvas, we are ready to take the next step — making the ball move. To do this, we paint the ball on the screen, clear it, and then draw it again in a different position. Doing animations on Canvas is like making a stop-motion movie. We move the objects a little bit in each frame to animate them.
Drawing loop
Canvas uses immediate rendering — when we draw, it immediately renders on the screen. But, it is a fire-and-forget system. After we paint something, the canvas forgets about the object and only knows it as pixels. So there is no object that we can move. Instead, we have to draw it again.
To do this, we need to define a drawing function that runs with a different set of variable values each time. We can run functions over and over again using a JavaScript timing function such as requestAnimationFrame(), which has some clear benefits over setInterval():
- It enables browser optimizations.
- It handles the frame rate.
- Animations only run when visible.
The way to animate with requestAnimationFrame() is to create a function that paints a frame and then schedules itself to invoke again. By doing this, we get an asynchronous loop that executes when we draw on the canvas. We invoke the paint() function repeatedly until we decide to stop.
function play() {
  // Start loop
  animate();
}

function animate() {
  // Paint frame
  paint();

  // Schedule next frame
  requestAnimationFrame(animate);
}
We must remember to use the cancelAnimationFrame() method to cancel previously scheduled requests. If we forget to do this, we will notice the game going faster every time we press play since we will have more and more animation loops running in our code.
We can add the requestId to the game object and check for a value before running a new animation. And then, we set this variable each time we run a new requestAnimationFrame:
function play() {
  cancelAnimationFrame(game.requestId);
  resetBall();

  animate();
}

function animate() {
  paint();
  update();

  game.requestId = requestAnimationFrame(animate);
}
There is one more thing to do. We need to calculate how often the animation will progress a frame, otherwise the animation will run faster on high refresh rate screens.
Timer
We call the requestAnimationFrame() function when it’s time to update the animation for the next repaint. But to account for different screen refresh rates, we need to calculate if we should update our game at this call.
requestAnimationFrame(callback);
The callback function is passed one single argument, a DOMHighResTimeStamp similar to the one returned by performance.now(), indicating the point in time when requestAnimationFrame() starts to execute callback functions. We can use this timestamp to calculate when to paint and update our game.
First, we add a time object to keep track of everything related and set it in the resetGame() function:
function resetGame() {
  game.time = {
    start: performance.now(),
    elapsed: 0,
    refreshRate: 16
  };
}
We add a call to resetGame() in the play() function. Then in the animate loop, we add code that checks if the 16ms of the refreshRate have passed to see if it’s time to paint another frame:
function animate(timestamp) {
  game.time.elapsed = timestamp - game.time.start;
  if (game.time.elapsed > game.time.refreshRate) {
    game.time.start = timestamp;

    paint();
    update();
  }

  game.requestId = requestAnimationFrame(animate);
}
Now that we have a loop that keeps drawing the game at each frame, we need to change the position before the next paint.
Moving the ball
We defined the starting point at the bottom-center part of the Canvas with the coordinates of the ball object. After drawing the ball, we want to change the x and y to move it to a new position.
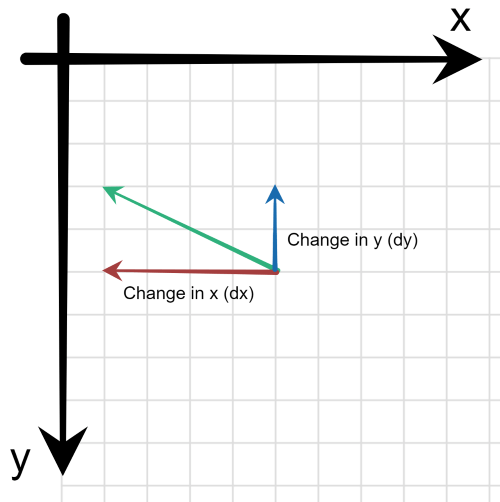
Without going too much into the math behind it we can use dx and dy to define the change. The larger the value of the change, the faster the ball moves.
The Greek letter Δ (delta) means the change in a variable.
We need a speed setting as a base for other movement-related variables. To speed up the game, we change this property.
When we launch the ball, it should be in a random upwards direction. If we always have the same trajectory, the game would get predictable fast. The ball moves upwards when dy has a negative value, so we set it to -speed. With Math.Random(), we can randomize the direction on the x-axis the ball shoots off:
function resetGame() {
  game.speed = 7;
  game.time = {start: performance.now(), elapsed: 0, refreshRate: 16};
}

function resetBall() {
  ball.x = canvas.width / 2;
  ball.y = canvas.height - 100;
  ball.dx = game.speed * (Math.random() * 2 - 1);  // Random trajectory
  ball.dy = -game.speed; // Up
}
Then we update x and y with with the change on every frame. The ball will be painted in the new position on every update. Adding these two lines gives us this update() function:
function update() {
  ball.x += ball.dx;
  ball.y += ball.dy;
}
We call update() from the animate() function after painting the current frame. This way, we are prepared with the new positions for the next paint.
Before each new frame, we need to clear the canvas. We can do this with the CanvasRenderingContext2D.clearRect() method, which erases the pixels in a rectangular area by setting them to transparent black. But instead, we can start each new frame by drawing the background, which also clears everything from the previous frame. To keep our animate function clean, we can add all the code that has to do with drawing objects to the canvas to a paint() function:
function paint() {
  ctx.drawImage(images.background, 0, 0, canvas.width, canvas.height);
  ctx.drawImage(images.ball, ball.x, ball.y, 2*ball.radius, 2*ball.radius);
}

function animate() {
  paint();
  update();

  game.requestId = requestAnimationFrame(animate);
}
Each frame canvas clears by painting the background. Then we draw the ball before updating the x and y values for the next frame. By scheduling a new run of the animate() function with requestAnimationFrame() we create an animation loop.

Collision detection
In the previous chapter, we got the ball moving. But it quickly travels off the screen and ends the fun. We need to implement collision detection to make the ball bounce off the walls.
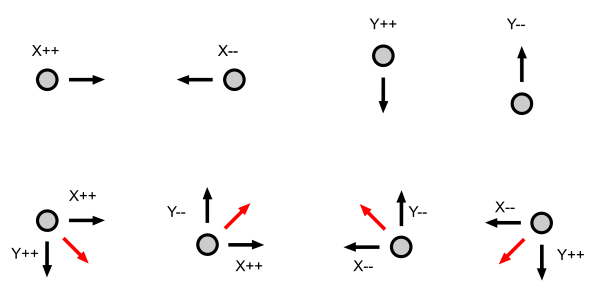
First, we need to calculate when a collision happens. After that, we need to think about which direction we were moving when we hit the target object. Then we can send the ball the opposite way after the hit.
Boundaries
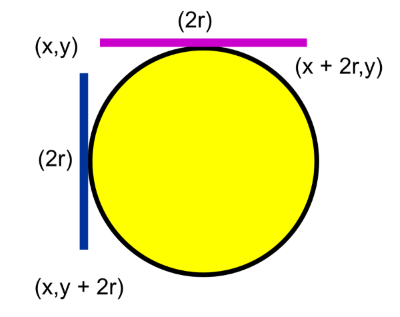
For the ball to be inside the game field, all three of the following statements need to be true:
- X of the ball is greater than x of the left wall.
- X of the ball is less than x of the right wall.
- Y of the ball is greater than y of the roof.
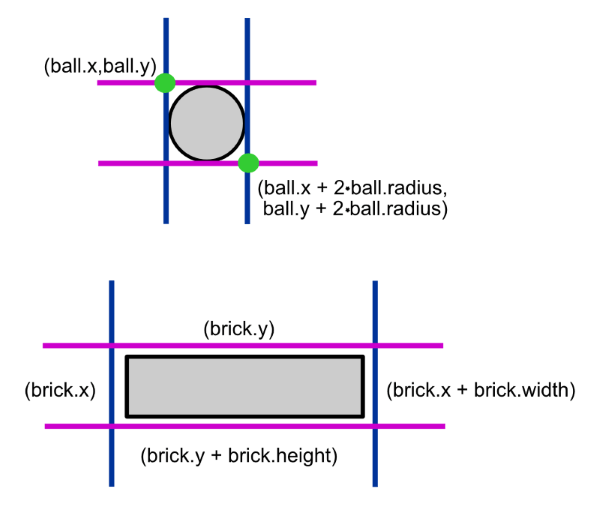
The ball is drawn to the canvas at coordinates from the upper left corner. We need to consider the width of the ball. Therefore, we need to consider the ball width when checking for collisions on the opposing sides. The width, or the diameter, equals two times the radius of the ball (2r).
Detecting collisions
The first wall that the ball flies through is the right one. We can detect when the ball collides with it by checking when x is larger than the width of the canvas. In this case, we need to add 2*ball.radius since the collision happens with the right side of the ball.
When the collision happens, we make the ball move in the opposite direction by reversing the movement on the x-axis by negating the delta x (dx):
if (ball.x + 2 * ball.radius > canvas.width) {
  ball.dx = -ball.dx;
}
When we hit the left wall, we reverse the direction of the x-axis again. This time we check for when x is less than zero, where the x-axis starts. In this case, the collision happens with the left side of the ball, meaning we don’t need to change the x value:
if (ball.x < 0) {
  ball.dx = -ball.dx;
}
Lastly, we need to bounce off the roof. In this case, we reverse the movement on the y-axis when the y value goes below zero. The horizontal movement on the y-axis is represented by delta y:
if (ball.y < 0) {
  ball.dy = -ball.dy;
}
We add all these checks together into the function detectCollision():
function animate(timestamp) {
  game.time.elapsed = timestamp - game.time.start;
  if (game.time.elapsed > game.time.refreshRate) {
    game.time.start = timestamp;

    paint();
    detectCollision();
    update();
  }

  game.requestId = requestAnimationFrame(animate);
}

function detectCollision() {
  if(ball.x + 2 * ball.radius > canvas.width || ball.x < 0) {
    ball.dx = -ball.dx;
  }

  if(ball.y < 0) {
    ball.dy = -ball.dy;
  }
}
This code does what it is supposed to, but it can be hard to read. To increase readability, we add function expressions that return the calculations. We also need to make sure the coordinates aren’t outside the playing area. So we make sure to move the coordinates back to the wall:
function detectCollision() {
  const hitTop = () => ball.y < 0;
  const hitLeftWall = () => ball.x < 0;
  const hitRightWall = () => ball.x + 2 * ball.radius > canvas.width;

  if (hitLeftWall()) {
    ball.dx = -ball.dx;
    ball.x = 0;
  }
  if (hitRightWall()) {
    ball.dx = -ball.dx;
    ball.x = canvas.width - 2 * ball.radius;
    }
  if (hitTop()) {
    ball.dy = -ball.dy;
    ball.y = 0;
  }
}
That’s better! With this code implemented we have taken care of all the walls that we need the ball to bounce off. But as you might have noticed there is one collision that we have not taken care of yet.
Game over
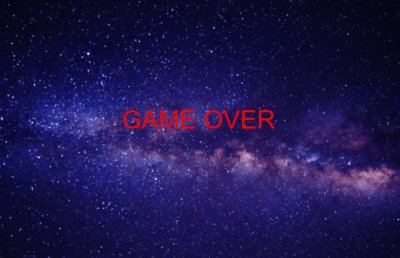
When the ball falls down the floor, we don’t want it to bounce back, but instead, this is when we lose the game — Game over.
Before we schedule the next run of animate(), we check if the ball went out of bounds at the bottom of the court. If the game is lost, we show a message to the user. We write text on the screen by setting the fillStyle and telling what and where we want it with fillText(). Here, we compute the message to be in the middle of the canvas:
function animate(timestamp) {
  game.time.elapsed = timestamp - game.time.start;
  if (game.time.elapsed > game.time.refreshRate) {
    game.time.start = timestamp;

    paint();
    update();
    detectCollision();

    if (isGameOver()) return;
  }

  requestId = requestAnimationFrame(animate);
}

function isGameOver() {
  const isBallLost = () => ball.y > canvas.height;

  if (isBallLost()) {
    gameOver();
    return true;
  }
  return false;
}

function gameOver() {
  ctx.font = '40px Arial';
  ctx.fillStyle = 'red';
  ctx.fillText('GAME OVER', canvas.width / 2 - 100, canvas.height / 2);
}
We use the return statement to short-circuit the animate() loop. If isGameOver() returns true, we don’t request the next frame. Now, if we run the code, the ball bounces off the walls as it should, and we get a game over screen when the ball falls out of bounds.
Paddle
Now that we have a ball bouncing off the walls, it’s time to evolve this demo into a game by adding player interaction. Let’s add a paddle that the player can control and bounce the ball off!
As per usual we start by adding some variables to define a paddle object:
let paddle = {
  height: 20,
  width: 100,
  get y() {
    return canvas.height - this.height;
  }
}
The paddle moves at the bottom of the court, so the value on the y-axis is constant. There is a dependency on the height property of the same object, which means we need to use a getter.
However, we need to keep track of where on the x-axis the paddle is at each moment. We want the paddle to start in the middle of the court every time we start a new life or level, so we define a function resetPaddle() where we compute the x value:
function resetPaddle() {
  paddle.x = (canvas.width - paddle.width) / 2;
  paddle.dx = game.speed + 7;
}
Finally, the paddle has to be faster than the ball so that we have a chance to catch it, so we set dx for the paddle to an increment of the game speed.
Drawing the paddle
Next, we add the code needed to draw the paddle at each frame. We add a paddle property to our images object and set the src to the image of the paddle. Then we use drawImage() as with the background and ball in the paint() function to draw the paddle in the correct position on each frame:
let images = {
  background: new Image(),
  ball: new Image(),
  paddle: new Image() // New
}

images.background.src = 'bg-space.webp';
images.ball.src = 'ball.webp';
images.paddle.src = 'paddle.webp'; // New

function paint() {
  ctx.drawImage(images.background, 0, 0, canvas.width, canvas.height);
  ctx.drawImage(images.ball, ball.x, ball.y, 2 * ball.radius, 2 * ball.radius);
  ctx.drawImage(images.paddle, paddle.x, paddle.y, paddle.width, paddle.height); // New
}
Controlling the paddle
Now that we have added the drawing logic, we can start with the fun part — giving the user control over the paddle! We should hold the left and right arrow keys down to move the paddle. To achieve this, we need the following:
- Variables to store the state of the left and right keys.
- Event listeners to know when the keys are pressed and released.
We can add leftKey and rightKey to our game object with the default value of false since the buttons will not be pressed at the beginning of the game:
let game = {
  speed: 8,
  requestId: null,
  leftKey: false,
  rightKey: false
}
Next, we add event listeners for the keydown and keyup events. These will be listening for key presses and releases:
document.addEventListener('keydown', keyDownHandler);
document.addEventListener('keyup', keyUpHandler);
When you press a key on your keyboard, the keydown event fires and invokes the keyDownHandler() function. As the key is released, the keyup event fires and invokes the keyUpHandler() function. The following code defines these functions and the keys we use for the left and right movements:
function keyDownHandler(e) {
  if (e.key === 'ArrowRight') {
    game.rightKey = true;
  } else if (e.key === 'ArrowLeft') {
    game.leftKey = true;
  }
}

function keyUpHandler(e) {
  if (e.key === 'ArrowRight') {
    game.rightKey = false;
  } else if (e.key === 'ArrowLeft') {
    game.leftKey = false;
  }
}
Both functions take an event as a parameter, represented by the e variable. The key property holds the information about the key that was pressed. Modern browsers use ArrowRight and ArrowLeft for the left/right arrow keys. When we press a key down, the relevant variable is set to true. When the key is released, the variable is changed back to false.
Moving the paddle
Now that we have set up the variables, events, and functions to update the variables, we can use these pressed variables to update the x position of the paddle to move it on the screen. We can do this in the update() function where we change the x coordinate if the left or right keys are pressed:
function update() {
  ball.x += ball.dx;
  ball.y += ball.dy;

  if (game.rightKey) {
    paddle.x += paddle.dx;
    if (paddle.x + paddle.width > canvas.width){
      paddle.x = canvas.width - paddle.width;
    }
  }
  if (game.leftKey) {
    paddle.x -= paddle.dx;
    if (paddle.x < 0){
      paddle.x = 0;
    }
  }
If the keys are pressed, we update the paddle.x variable by adding or subtracting the paddle.dx. We also need to check if we have reached the walls, and in those cases, we keep the x variable at these minimum and maximum values.
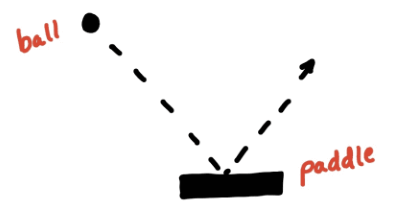
Bounce ball off the paddle
Lastly, we have to add collision detection for the paddle. When the ball hits the paddle, it should bounce off it back into the playing area.

To do this, we can check whether the ball has reached the paddle and is between the left and right edges of the paddle. Since we measure the ball from the top-left corner, we need to add 2*radius when we check whether the ball has reached the paddle or not. This is why we must update the values for the coordinates before checking for collisions. Likewise, when we check if the ball is hitting the paddle on the horizontal plane, we must remember the radius in our calculations:
function detectCollision() {
  const hitTop = () => ball.y < 0;
  const hitLeftWall = () => ball.x < 0;
  const hitRightWall = () => ball.x + 2 * ball.radius > canvas.width;
  const hitPaddle = () =>
    ball.y + 2 * ball.radius > canvas.height - paddle.height &&
    ball.y + ball.radius < canvas.height &&
    ball.x + ball.radius > paddle.x &&
    ball.x + ball.radius < paddle.x + paddle.width;

  if (hitLeftWall()) {
    ball.dx = -ball.dx;
    ball.x = 0;
  }
  if (hitRightWall()) {
    ball.dx = -ball.dx;
    ball.x = canvas.width - 2 * ball.radius;
  }
  if (hitTop()) {
    ball.dy = -ball.dy;
    ball.y = 0;
  }
  if (hitPaddle()) {
    ball.dy = -ball.dy;
    ball.y = canvas.height - paddle.height - 2 * ball.radius;
  }
}
Running the code, we can control the paddle and use it to bounce the ball.
Bricks
Bouncing the ball off the walls is fun and all but gets boring fast. What we need is something to destroy! And this is what we are doing in this lesson by creating a field of bricks.
Defining the bricks
First, we need to set up some variables to define the bricks. Add the following lines to your code to create a brick configuration object:
let brick = {
  rows: 5,
  cols: 10,
  get width() {
    return canvas.width / this.cols;
  },
  height: 30
}
Here we define the number of rows and columns of bricks and their height. We use a getter to compute the width of the bricks depending on the number of columns.
Brick field
We hold all our bricks in an array called brickField. It contains all the brick objects with position and size to paint each brick on the screen. We initialize the array with row and column loops. Then we add a brick to the brickField array in each iteration with the following properties:
- x position
- y position
- height
- width
- color
- points
- hitsLeft
We calculate the x and y coordinates from the row and column together with the width and height of bricks. The topMargin leaves some space at the top of the canvas that we will be using later.
Here we set the color by the row, but we could be even more creative when creating new levels. The points are also dependent on the row, giving more points for each row of bricks we get through. Bricks can withstand hits and sometimes require more than one hit before being destroyed. Here we set the bricks on the top row to disappear after two hits with the hitsLeft property:
function initBricks() {
  brickField = [];
  const topMargin = 30;
  const colors = ['red', 'orange', 'yellow', 'blue', 'green'];

  for(let row = 0; row < brick.rows; row++) {
    for(let col = 0; col < brick.cols; col++) {
      brickField.push({
        x: col * brick.width,
        y: row * brick.height + topMargin,
        height: brick.height,
        width: brick.width,
        color: colors[row],
        points: (5 - row) * 2,
        hitsLeft: row === 0 ? 2 : 1
      });
    }
  }
}
The code above will loop through the rows and columns and create the new brick objects that we add into the array of bricks.
Drawing the bricks
Now let’s create a function to draw the bricks. First, we check if hitsLeft is more than zero, which means the brick is still visible. If it has hits left, it’s drawn on the screen. We then set the color from the brick properties before using fillRectangle() and strokeRectangle() to paint the bricks:
function drawBricks() {
  brickField.forEach((brick) => {
    if (brick.hitsLeft) {
      ctx.fillStyle = brick.color;
      ctx.fillRect(brick.x, brick.y, brick.width, brick.height);
      ctx.strokeRect(brick.x, brick.y, brick.width, brick.height);
    }
  });
}
Then we need to add a call to drawBricks() in the paint() function to draw the field of bricks in every frame.
Brick collisions
Now that we have made the bricks appear on the screen, it’s time to make them disappear when we hit them with the ball.
When we check for collisions between the ball and bricks, we first check if the ball is inside the brick. Then we check from which direction the ball hit the brick to know what direction change to make.
For the ball to be inside the brick, all four of the following statements need to be true:
- The x position of the ball is greater than the x position of the brick.
- The x position of the ball is less than the x position of the brick plus its width.
- The y position of the ball is greater than the y position of the brick.
- The y position of the ball is less than the y position of the brick plus its height.
To start, we want to create a collision detection function that loops through all the bricks, comparing the ball with its position. For better readability of the code, we define a function expression isBallInsideBrick with all our calculations:
function detectBrickCollision() {
  const isBallInsideBrick = (brick) =>
    ball.x + 2 * ball.radius > brick.x &&
    ball.x < brick.x + brick.width &&
    ball.y + 2 * ball.radius > brick.y &&
    ball.y < brick.y + brick.height;

  brickField.forEach((brick) => {
    if (brick.hitsLeft && isBallInsideBrick(brick)) {
      brick.hitsLeft--;
      if (brick.hitsLeft === 1) {
        brick.color = 'darkgray';
      }
    }
  });
}
As we saw earlier, when we drew the bricks, we know if the brick is visible or not with the hitsLeft property. We decrease it when the brick gets hit. We also set the color to grey for the top row that requires two hits before being destroyed.
We have the bricks disappearing now when we hit them, but it would also be nice if the ball changes direction as we do so.
Collision direction
To bounce the ball in the right direction after a collision, we need to know what side of the brick the ball hit.
We can calculate if the ball was coming from the left or right by removing the change ball.dx and find out if the ball was on the left or right side of the brick before impact. If this is true, we negate the dx to make the ball bounce back from where it was coming:
// Check if ball is inside from left side
ball.x + 2 * ball.radius            > brick x
// Decrease by dx and check if position was on left side of brick x
ball.x + 2 * ball.radius - ball.dx <= brick.x;

// Similarly for right side
ball.x            < brick.x + brick.width
ball.x - ball.dx >= brick.x + brick.width
If neither of these cases is true, then we know that the ball hit the brick on the top or bottom, and in that case, we negate ball.dy to make the ball bounce back.
Sometimes we hit multiple bricks in the same frame. If we, for example, hit two bricks from the bottom and change the direction twice, the ball will be traveling right through the bricks. For this reason, we need to have a variable directionChanged that keeps track so that we only change direction once per frame:
function detectBrickCollision() {
  let directionChanged = false;
  const isBallInsideBrick = (brick) =>
    ball.x + 2 * ball.radius > brick.x &&
    ball.x < brick.x + brick.width &&
    ball.y + 2 * ball.radius > brick.y &&
    ball.y < brick.y + brick.height;

  brickField.forEach((brick) => {
    if (brick.hitsLeft && isBallInsideBrick(brick)) {
      brick.hitsLeft--;
      if (brick.hitsLeft === 1) {
        brick.color = 'darkgray';
      }

      if (!directionChanged) {
        directionChanged = true;
        detectCollisionDirection(brick);
      }
    }
  });
}

function detectCollisionDirection(brick) {
  const hitFromLeft = () => ball.x + 2 * ball.radius - ball.dx <= brick.x;
  const hitFromRight = () => ball.x - ball.dx >= brick.x + brick.width;

  if (hitFromLeft() || hitFromRight()) {
    ball.dx = -ball.dx;
  } else { // Hit from above or below
    ball.dy = -ball.dy;
  }
}
The last thing to do is to add a call to the detectBrickCollision() function to our animate() function, just below the collisionDetection() call. With these changes, we can break bricks. And when we hit one, the ball bounces as expected.
Score, levels, and lives
Now that we can destroy the bricks, the game is ready to award points for hitting them and keep a count of the total score. And when all the bricks get obliterated, the game should continue to the next level. And wouldn’t it be nice to have more than one life to get another chance when we can’t catch the ball?
Game variables
To keep track of all of these new states in the game, we add them to the game object. Since these values need to reset at the start of each game, we add them to the resetGame() function:
function resetGame() {
  game.speed = 8;
  game.score = 0;
  game.level = 1;
  game.lives = 3;
}
Display text
Drawing text on a canvas is similar to drawing a shape. First, we set the size and type of the font. Next, we use fillStyle to set the color of the font and finally fillText() to tell what text and where we want to display on the canvas.
The next step is to show all these new variables on the screen so that the player has current information available at all times. Let’s add a drawScore() function that creates and updates the display with the level and score:
function drawScore() {
  ctx.font = '16px Arial';
  ctx. fillStyle = 'white';
  const { level, score } = game;
  ctx.fillText(`Level: ${level}`, 5, 20);
  ctx.fillText(`Score: ${score}`, canvas.width / 2 - 50, 20);
}
The code above prints the current level and the number of points at the top of the screen.
Lives left
We could also write the lives with text, but to make it fancier, we can show a tiny paddle for each life that we have remaining. We can do this by using the same image as for the paddle and drawing it for each life we have left:
function drawLives() {
  if (game.lives > 2) ctx.drawImage(images.paddle, canvas.width - 150, 9, 40, 13);
  if (game.lives > 1) ctx.drawImage(images.paddle, canvas.width - 100, 9, 40, 13);
  if (game.lives > 0) ctx.drawImage(images.paddle, canvas.width - 50, 9, 40, 13);
}
Now, a small paddle shows up on the right top of the screen for each of our lives. To use the functions we created for the game information, we add calls to them in the draw() function:
function draw() {
  ctx.drawImage(images.background, 0, 0, canvas.width, canvas.height);
  ctx.drawImage(images.ball, ball.x, ball.y, 2 * ball.radius, 2 * ball.radius);
  ctx.drawImage(images.paddle, paddle.x, paddle.y, paddle.width, paddle.height);
  drawBricks();
  drawScore(); // New
  drawLives(); // New
}
Updating values
Now that we display all of our variables on the screen, we need to update them to add to the score and levels while at the same time keeping track of the lives we lose.
Score
Remember when we added what each brick is worth in points in the last chapter? The time has come to add those to our total score each time we destroy one.
To increase the score, we add the points that the brick is worth every time we hit one in detectBrickCollisions():
game.score += brick.points;
Now, that was easy! The next value is a bit more complicated.
If you want to add a high score list, read my article:
Levels
When there are no more bricks, we proceed to the next level. There are no more bricks left when all the bricks have hitsLeft equal to zero. How can we check all elements in an array for a specific value of a property?
The array method best suited for this is every(). It can check whether all elements in the array pass the tests we provide. Check for when there are no bricks left, and in that case, go to the next level:
function isLevelCompleted() {
  const levelComplete = brickField.every((b) => b.hitsLeft === 0);

  if (levelComplete) {
    initNextLevel();
    resetBall();
    resetPaddle();
    initBricks();
    game.timeoutId = setTimeout(() => animate(), 3000);

    return true;
  }
  return false;
}

function initNextLevel() {
  game.level++;
  game.speed++;
  ctx.font = '40px Arial';
  ctx.fillStyle = 'yellow';
  ctx.fillText(`LEVEL ${game.level}!`, canvas.width / 2 - 80, canvas.height / 2);
}
We add a call to isLevelCompleted() in the animate() function that exits before requesting a new frame if the level has been completed:
if (isLevelCompleted() || isGameOver()) return;
When we have no more bricks left, we increase the game.level. When we get better at Breakout, the starting speed gets too easy. And too easy means boring. We increase the difficulty by increasing the game.speed when we advance levels.
Then we reset the playing field, with the result that the ball and paddle move a bit faster on the new level. Remember that we stop the animations if the level completes? The reason is that we want to show a screen for a few seconds before continuing the game. We use setTimeout() and set the number of milliseconds to pause before continuing the game.
Similarly, as we did with cancelAnimationFrame(), we add clearTimeout(game.timeoutId) to the beginning of the play() function to make it possible to start a new game between levels without another animation loop starting up.
Lives
Lastly, we alter the gameOver() function to check whether we have lives left before going to the game over. We decrease lives, and when we reach zero, the game is over. Otherwise, we get a new ball by calling resetBall():
function isGameOver() {
  const isBallLost = () => ball.y - ball.radius > canvas.height;

  if (isBallLost()) {
    game.lives -= 1;
    if (game.lives === 0) {
      gameOver();
      return true;
    }
    resetBall();
    resetPaddle();
  }
  return false;
}

Sound
No game is complete until we at least add some sound effects. There are many free websites to find sound samples to use. I selected some from freesound.org.
We are going to add sound effects for:
- The ball hitting the paddle
- The ball hitting a brick
- Ball launch
- Game over
- Level completed
The Audio() constructor creates and returns a new HTMLAudioElement which can be used to play the audio:
const audioElement = new Audio(url);
audioElement.play();
An optional DOMString contains the URL of the audio file:
const sounds = {
  ballLost: new Audio('./sounds/ball-lost.mp3'),
  breakout: new Audio('./sounds/breakout.mp3'),
  brick: new Audio('./sounds/brick.mp3'),
  gameOver: new Audio('./sounds/game-over.mp3'),
  levelCompleted: new Audio('./sounds/level-completed.mp3'),
  music: new Audio('./sounds/music.mp3'),
  paddle: new Audio('./sounds/paddle.mp3')
}
We add sounds similar to how we created images, except we can add the URL in the constructor.
Now we can play these elements when finding where in the code they belong. For example, we add the gameOver sound to the gameOver() function. Sometimes we hit multiple bricks. To start the sound over when we hit the next brick, we set currentTime to zero:
sounds.brick.currentTime = 0;
sounds.brick.play();
You might have noticed that we added music in the sounds object. The game music starts when we press start and ends at game over. Since we don’t want the music to end we set it to repeat:
sounds.music.loop = true;
We can set the volume of the audio between 0 and 1. To be sure the music is not too loud at the start we can set it a bit lower than max:
sounds.music.volume = 0.5;
We could also add some keyboard triggers into the keyDownHandler to toggle the music on and off and to control the volume. With all the sounds in place, we truly have something starting to resemble a complete game.
Conclusion
Today we learned how to create a complete game with the HTML Canvas and JavaScript. I hope you enjoyed the article and learned something new.